RITA operators must select the “Move to Consignment” option to approve service requests from partners. This action will redirect you to the Consignment page.
Operators should verify that the information provided in the service requests is accurately reflected in RITA. All information in the service request form is highlighted in yellow.
Once the operator confirms that all the information is correctly entered into RITA, they should click “Save New Consignment” at the top right of the consignment screen. RITA will then issue a consignment identification number.
Finally, when the Logistics Cluster is ready to provide the service, change the consignment status to “Accept” to proceed with the cargo movement.
 | RITA will display an error message if an organization is not pre-registered. Please contact RITA GLOBAL at rita.global@wfp.org for registration. |
Uploading SRF Excel Template
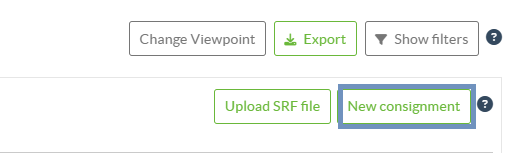
If the operator wants to upload a saved Service Request Form (SRF) in the template Excel format, click the “Upload SRF form” button on the top right section of the screen:
- Click on Choose SRF file and select the SRF file saved on the desktop or in the local folder.
- Upload the file by clicking the Upload SRF form button.

Create Consignment Manually
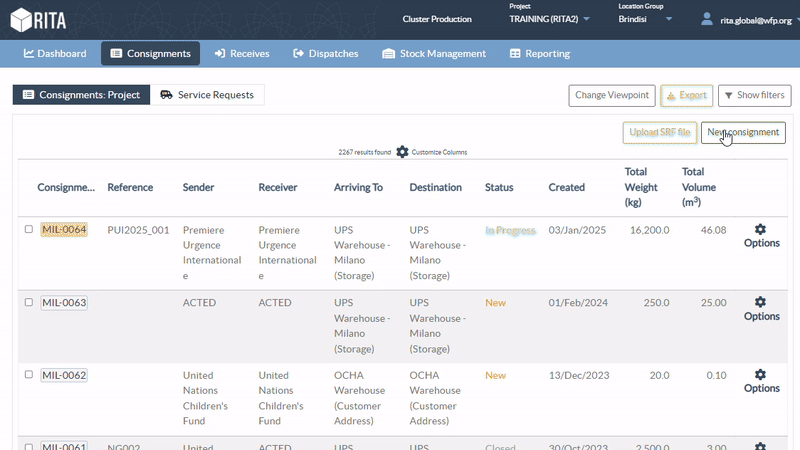
If the operator needs to create a new consignment manually, click on the “New Consignment” button located on the right side of the screen.
Please fill in the required information manually in the corresponding fields, ensuring that the following details are completed:
- Sender/Receiver Organization: Select the sender and receiver organization from the list of organizations registered in RITA. If any new organization is not registered in RITA, the operator must request RITA GLOBAL at rita.global@wfp.org.
- Sender Contact: Click the plus sign “+” next to the sender’s contact. In the box, provide the receiver's name, job title, phone number, and email address, and click "Save Changes."
- Receiver Contact: Click the plus sign “+” next to the receiver’s contact. In the box, provide the receiver's name, job title, phone number, and email address, and click "Save Changes."
- Clearing Agent details: Click the plus sign "+" next to the clearing agent box. Then, on the screen that appears, provide the details of the clearing and forwarding agent.
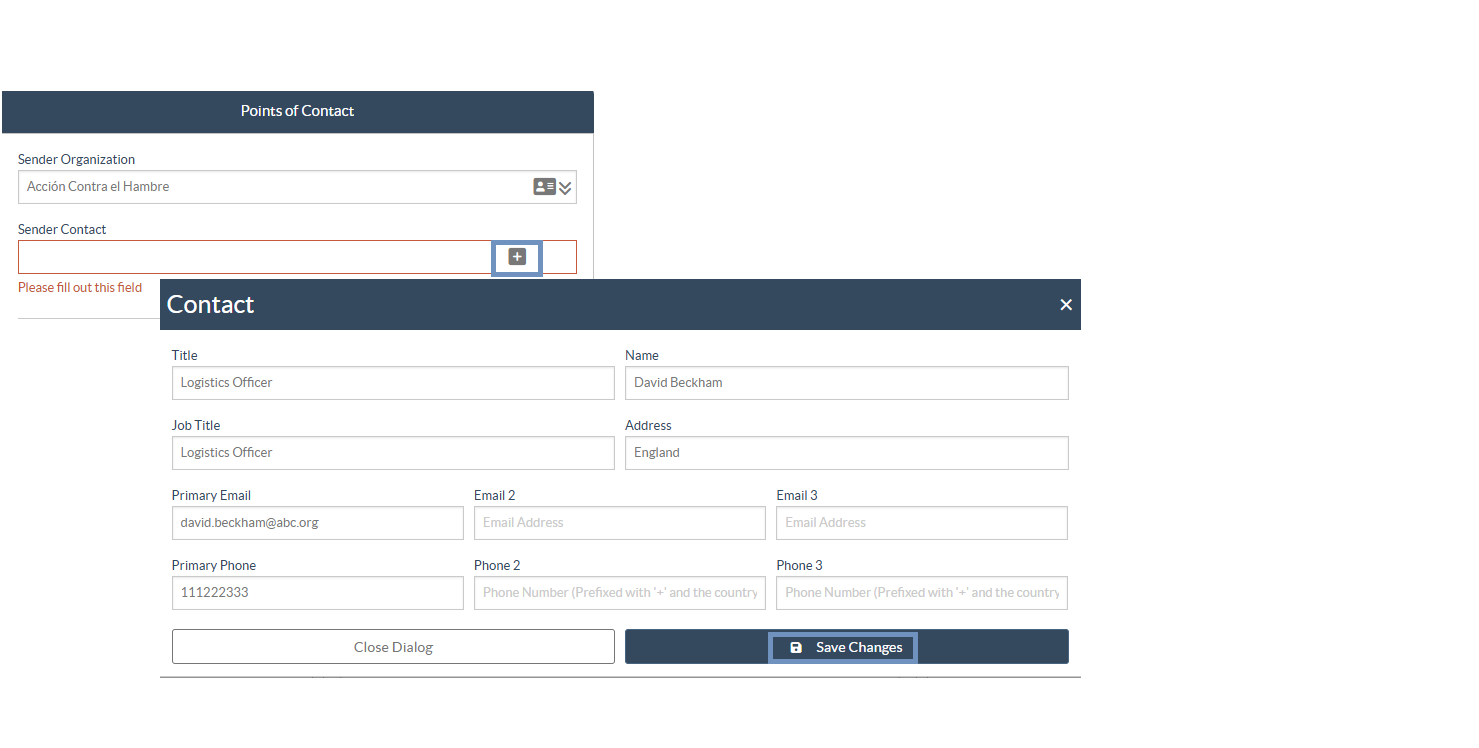
Note: Each requestor can provide up to three email addresses and contact numbers.
Starting Point: Select the starting point for the cargo.
- If the cargo is to be picked from the Partners/Customers Address, select the “Collect from Customers Address” option.
- If the cargo is shipped to the port or terminal for temporary storage before transferring to the final destination, select the “Transshipment into Port” option.
- If the cargo is picked up by the customers from the warehouse or delivered to the warehouse by the customer, select the Customer “Delivery/Warehouse Pickup” option.

Pick-up address: Select the pickup address according to the starting point of the cargo selected.
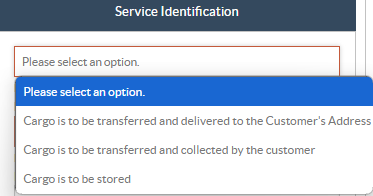
Service Identification: Select the service requested from the dropdown lists of the Service Identification box.
- If transport service is requested from a starting point to the destination, select “Cargo is to be transferred and delivered to the customers address” option.
- If transport is requested to a certain point, after which it is released to the customer, select “Cargo is to be transferred and collected by the customer.”
- If cargo is to be stored at the warehouse, select the “Cargo is to be stored” option.
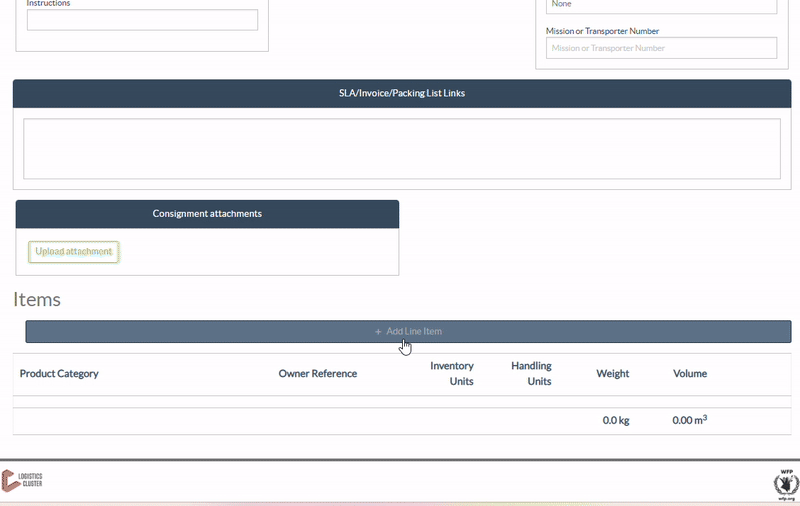
Consignment Attachments: The operator can attach supporting PDF or image files such as waybills, packing lists, GRNs, or other relevant documents received from the requestor. For online SRFs, attachments can be viewed directly from the Consignment screen.
Note: The maximum file size allowed for each attachment is 10 MB.
Step1: Click on “Upload Attachment".

Step2: A dialog box will open, allowing you to either choose a file from your computer or drag and drop a file directly into the drop zone. Under Attachment Type, select the appropriate document category from the dropdown list. The available options include Waybill, Packing List, Pictures of Cargo, GRN-In, GRN-Out, Loss Report, Other.
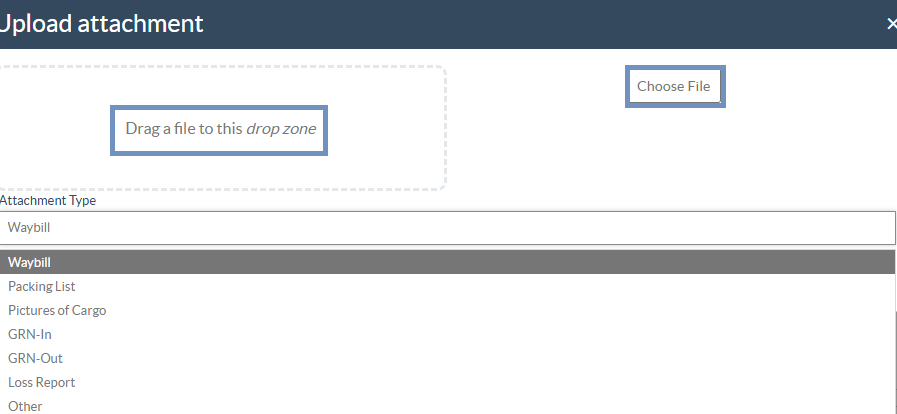
Step3: Once the file is selected and the type is defined, click “Upload” to attach the document to the consignment.
Note: Multiple files can be uploaded individually, and each attachment must be categorized using the appropriate Attachment Type.
SLA/Invoice/Packing List Links: This section allows the operator to include additional comments or reference links related to the consignment, such as Service Level Agreements (SLA), Invoices, or Packing Lists. These links or notes serve as supporting references for documentation and verification purposes.
Note: This field is optional and can be used to provide quick access to external documents.

Save Changes: Click the "Save Changes" button at the top right of the page to save the consignment.
Add Line Item: Once the consignment is saved, the “Add Line Item” button will appear under the Items tab. Click this button to enter detailed cargo information for the consignment.
Step1: Click on the “Add Line Item” button to enter detailed cargo information under the Items tab.

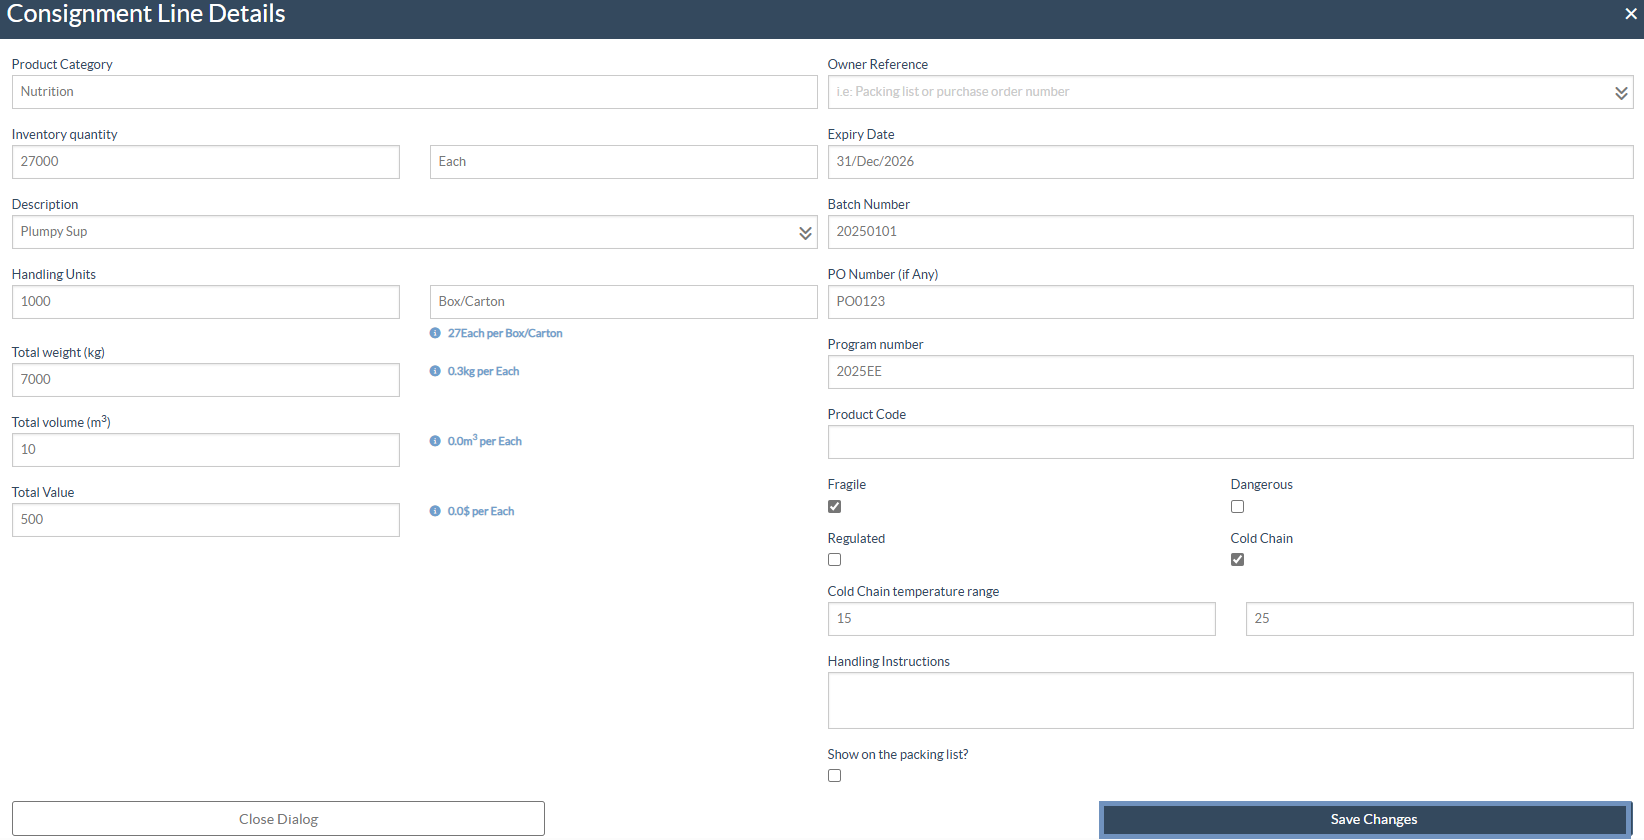
Step2: When selected, a dialog box titled “Consignment Line Details” will open. Within this window, the operator must fill in all relevant cargo details in the same format used in the Service Request Form (SRF). This includes Product Category, Inventory Units and Quantity, Item Description, Handling Units and Quantity, Weight and Volume, Owner Reference (E.g., Packing list number), Batch Number, Program Number, and Product Code (If any), and the special handling instructions, such as Fragile, Dangerous, or Cold Chain items (with the option to define a temperature range)
Step3: Once all fields are completed, click “Save Changes” to add the line item to the consignment record.
Note: The “Add Line Item” button becomes available only after the consignment has been saved.
Details of Transportation: The Details of Transportation tab provides users with an overview of pallets associated with a consignment.
Once a pallet is defined in the Service Request Form (SRF) by partners, the related Transport Unit details are automatically transferred into the system and displayed under this tab. Clicking on the “Details of Transportation” tab opens a page listing all pallets linked to the consignment.

Note: Pallet information can only be modified when the consignment is in “Accepted” status.
Viewing Options: To adapt the display for operational requirements, two features are available:

- Show Details: A toggle switch that expands each pallet to display detailed cargo information (such as item name, quantity, and unit type). When turned off, the view collapses into a compact format.
- Group Similar: When enabled, pallets containing similar item categories (e.g., Logistics, WASH, Shelter) are grouped together. This feature supports a cleaner display and easier navigation, especially when managing large inventories.
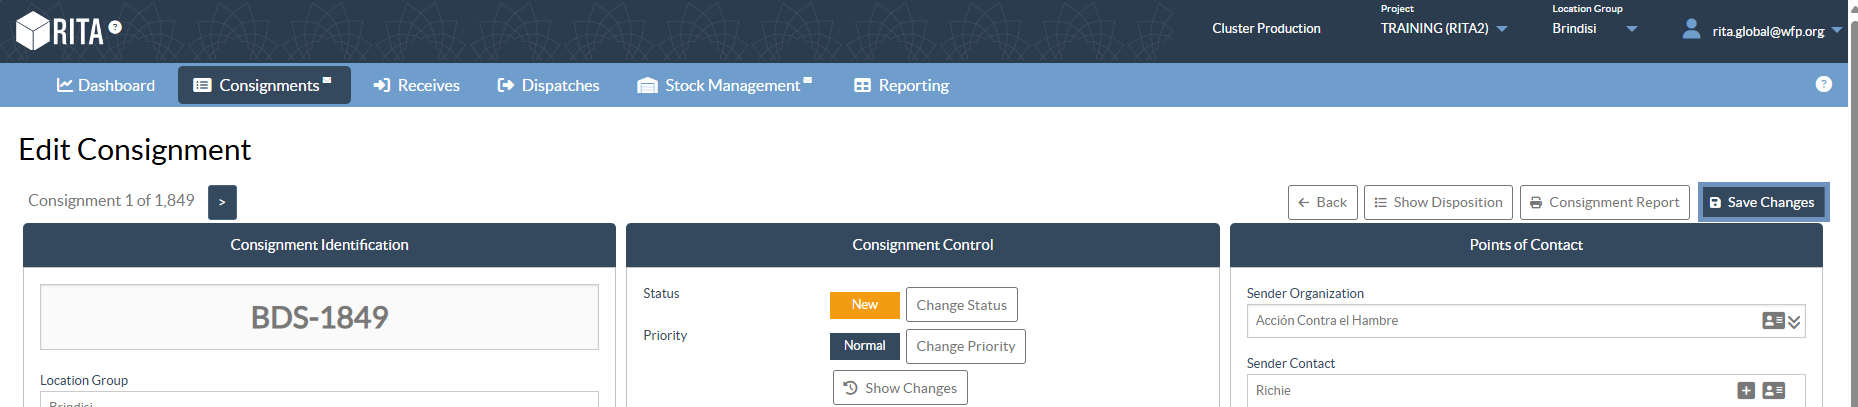
Accept Consignment: Once all the required information has been entered and verified, scroll to the top of the screen to access the "Consignment Control" section.
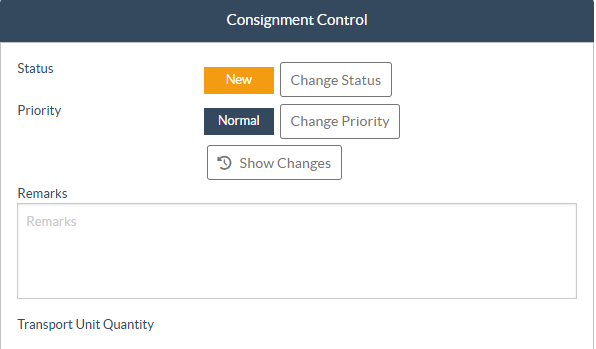
Status:
- Under this section, you will find the "Status" field. By default, the consignment status is set to “New.”
- The operator must click on “Change Status” and select “Accepted” from the dropdown list to confirm and proceed with the consignment.
- If the consignment cannot yet be processed, the operator may select “On-Hold” to temporarily postpone the request or choose “Cancel” to withdraw it entirely.
Priority:
- Click "Change Priority" to choose the service request priority.
- The service provider can select between Urgent, High, Normal, or Low, depending on the priority of the request, and provide the reason for the same.
Remarks: The requestor can utilize the remarks section to provide specific handling instructions or any relevant information regarding cargo storage and the requested transport service.
Number of Pallets: The requester can specify the number of pallets loaded onto trucks for the requested cargo transport and storage.
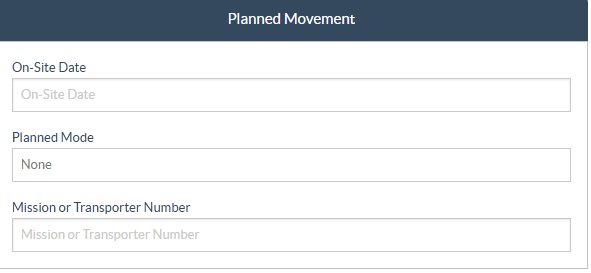
Planned Movement: Enter the scheduled date of movement, planned mode of transport, and the transporter’s contact or reference number.
Note: This information is optional and can also be defined later during the Dispatch Planning stage.